Previously, we discussed the rough framing phase which, involved marking and building the foundation for doors, walls, stairs, woods, etc. After the framing phase, siding and roofing can take place alongside. Apart from this, we can also start plumbing and electrical installation.
The process can be complex and tough to understand. But the following guide to plumbing and electrical installation is a way to help you learn the basics of the concepts that make up a complete and well-designed installation.
Plumbing codes
If you are not aware of the term plumbing code, ensure to hire a plumber who is well aware of the term and helps in plumbing installation.
Plumbing codes are a set of rules and regulations imposed by countries, states, or cities.
Purpose of plumbing codes
The main purpose of plumbing codes is to enhance water efficiency, and the plumber needs to make sure all plumbing codes are followed as the rules prescribed by authorities.
Impact of plumbing codes
There are 3 major areas where plumbing codes play an important role.
Drainage
Pipes and Fittings
Fixtures
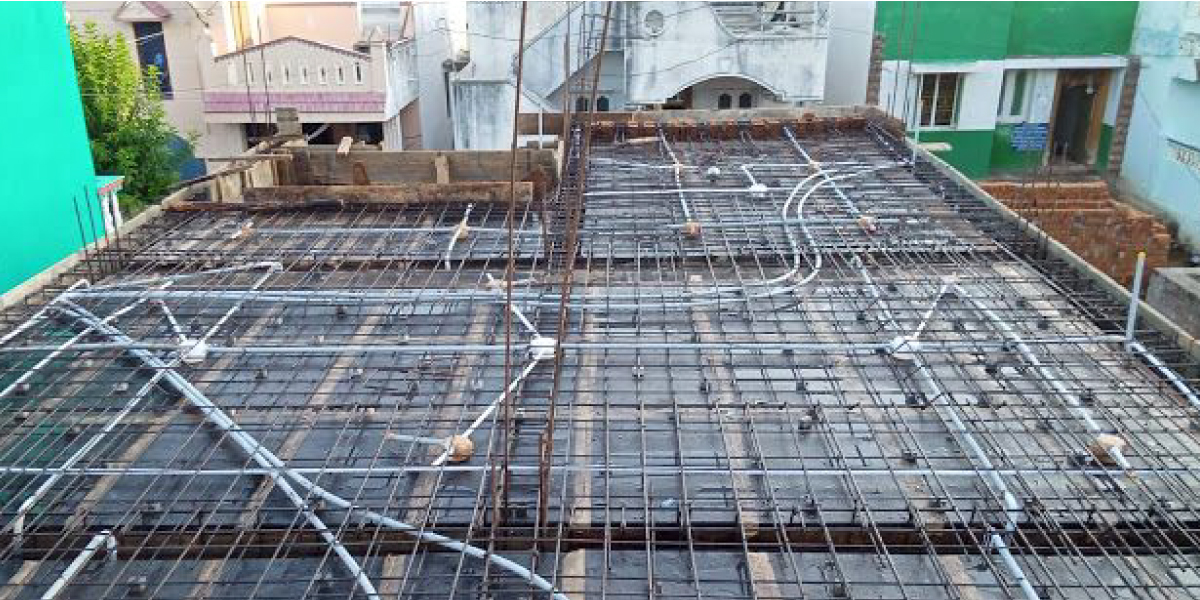
Rough plumbing and electrical installation
This phase includes the following tasks.
Pipelines and Wires
Drain Lines and Ventilators
Water Supply Lines
Bathtubs, Shower stall Units
Pipework for HVAC system
HVAC Vent Pipes
Let’s discuss this in detail.
Pipelines and wires
Plumbing and electrical contractors initiate the wiring process through the internal walls, roofs, and floors.
Drain Lines and ventilators
Drainpipes and vents, along with water supply lines for each connection, are fixed.
Bathtubs, shower stall units
Bathtubs and shower stall units are in place at this point.
Pipework for HVAC system
The initial phase of piping for the HVAC( heating, ventilation, and air conditioning) system and the furnace is in process at this stage. The installation of HVAC vent pipes is through the roof. And the insulation is done in the floor, ceilings, and walls.
You must be worried about how to design your bathroom or what to consider while plumbing.
While designing for a bathroom, make sure to follow these points.
Sufficient ventilation for comfortable use. Also, ensure your bathroom has natural lighting.
High-quality bath fittings and sanitary fittings are a must to avoid any wear and tear.
Elevate the bathroom floor by 5 cm as compared to other floorings of the house.
Bathroom counter top materials
There are various kinds of materials available if you are looking for what to choose for countertops.
Material Type | Description |
Laminates | Inexpensive, available in different colours and patterns are the characteristics of this type of material.
|
Ceramic | However, one of the trending and affordable items among premium countertop materials is brittle and requires periodic cleaning to avoid discolouration. |
Concrete | Holds position in popular materials for designing countertops. The only disadvantage here is if there are any cracks, you cannot choose to repair them as replacement is the only option for this type.
|
Solid surface | Easy to care for and removes stains easily. A perfect option if you are planning to redecorate your bathroom. |
Natural stone | Luxurious and suitable for bathrooms that are less used. |
Sewage line
How the new homeowner learns to install a sewage line from the city is always a doubtful question. It is possible to survive despite the sewage line running improperly, but it is not a good option and, you should better not do it.
It is a five-step process that will guide you in the process of making a sewer line.
Determine the elevations
For this task, it is essential to determine how high the pipe needs to go to prevent any pipe from running underground.
The sewer pipe starts from your home's main drain if you are looking for a residential installation.
Eventually, the line slopes to where it connects to the main city branch, at a connection named a tap.
By levelling the ground with an elevation laser level, surveying with a GPS, or using traditional surveyor's equipment, these project managers can pinpoint exactly how much of their intended site is being affected and where additional levelling needs to occur.
Measure the slope
For slope calculations, the length of the pipe and elevations are taken into consideration.
The slope of a pipe is calculated using its pipe dimensions. It is the ratio between the downward slope and the upward movement slope versus the total length of the pipe.
Trench and bedding
Trenching is important to avoid unnecessary disturbance of the soil. It is recommended that the trench be as narrow as possible, but one should know where the pipe ends. The bottom of the trench should follow the shape of the slope and must be smooth and compact.
A bedding material known as sand is used in the trenching process to support the pipe. As compared to soil, sand is also much easier to use for fine-tuning before the pipe is installed.
Pipe installation
One section at a time is the process followed in pipe installation. The process starts from the lower end of the pipe to the higher elevation.
Sewer pipes are made of PVC and are joined with solvent glue. The standard pipe size is 4 inches for residential lines. To check the required pipe material and size, look for local code. It determines the pipe material and size.
Backfill the trench
The backfilling process starts with a sheet of sand to protect the pipe and reduce any voids around the pipe. Then, the trench is packed with the added layers of soil.
Wiring:
Wiring your home could be one of the most exhausting tasks if you have no idea about wiring, electricity, and your needs. Are you planning to build your dream house very soon or thinking of rewiring it? You are at the right spot!
Once the roofing process is at the end stage, an electrician performs the following tasks.
He installs holders for lights and switches.
It runs wires from the circuit breaker board to each box. The process also includes wiring for cable TV, music systems, and phones.
Once the HVAC plumbing and ductwork is completed, an electrician starts the wiring process as it is easier for him to run the wire around the pipes and ducts.
Electric wiring?
Electric wiring is an essential construction task that you must do correctly to avoid danger. With insufficient knowledge of how electricity is transmitted and led in homes, it is easy to make mistakes that may have fatal consequences.
Here is a guide to understanding the procedure for electric wiring at your home
Designing
A diagram that indicates the exact location of the breaker and the path to each outlet is drawn. The designing phase helps in understanding the structure of the house for wiring purposes.
Cable installation
Cable installation always starts by taking the longest wire to avoid any wastage. Begin wiring upstairs gradually, moving towards the basement area.
Always remember to leave one foot of extra wire at each end to avoid any shortage further. There are times when you need to move stuff around later.
Determining outlets
One of the essential tasks is determining the number of outlets. You need to decide on how many outlets will be connected to a single circuit. Commonly, six outlets per 110-voltage circuit are recommended in a living area.
Six outlets on a 110-volt circuit might sound like a safe bet, but not if you live in a 1,500-square-foot house.
Note: A common math mistake is forgetting to factor in the square footage when figuring out how many outlets one circuit can handle. 1500x1.4=1800. A single circuit is inadequate if you live in 1800 square feet of floor space; you require at least two.
Drilling
Drilling holes requires knowledge about how and where everything is structured. Before drilling the holes, look for what is on the other side of the wall. This process will avoid drilling into electrical wires, pipelines, or water pipes. Tap in the middle of the studs where the wires will go under the floor using a 1-inch bit. This process will help you keep your home safe.
Setting up a breaker box
A breaker box in a basement area or a utility room is the ideal place to locate as it will be easier to access in the future.
Wiring phase
Now refer to the diagram prepared in the designing phase.
Procedure
Place the roll of the wire near the breaker box and pull the wire as per the diagram.
Make sure to connect the wire to the nearest outlet or switch for each circuit. Another option is to run the wires straight through the box.
Always use wire strippers to remove the plastic coating from the ends of the wires.
Now, attach them to each outlet, fixture, or switch.
Circuit installation
Individual circuit for each wiring set is a must. The circuits must match the current and the purpose of your outlet.
Insulation
If you’re looking to insulate your newly built home, you will need to know which type of insulation to buy. Insulation is the material that prevents unwanted heat from entering or escaping from the interior of a building.
R-value
To choose the insulation type, one needs to check the R-value. It indicates how well the insulation material can resist heat transfer. The larger the value, the greater the thermal resistance will be.
Here are some common types of insulation that you should be aware of.
Fibreglass
One of the popular insulation types.
It comes in two forms: pre-cut batts and rolls.
Uses | Benefits | Drawback |
It is part of thermal and acoustic objects such as wall decays, attics and, other crucial open spaces in a building.
| Easy to work. Inexpensive and easy to use in framing. | If incorrectly installed, it can lead to a fire hazard and is vulnerable to moisture. |
Cellulose
It is gaining popularity and is made of recycled newspapers.Uses | Benefits | Drawback |
Used to fill cavities and spaces. It is also available on boards and mats.
| Eco friendly Fire and Insect Resistant | Expensive and requires a special machine to install. It is tough to wrap around pipes and requires drywall. |
Rigid foam
A construction material that helps in controlling indoor temperature..
Uses | Benefits | Drawback |
High-quality rigid foam is used to seal gaps and close air leaks. It is usually part of thin walls and garage doors.
| High R-value. Affordable and helps in noise reduction. | Insects and pests can pass through if incorrectly installed. |
Waterproofing and how it helps?
Dampness can damage any construction site. Sometimes water can get in a wall or woodwork that you cannot fix. Water could turn into a big problem if it is not dealt with quickly.
It is essential to waterproof your house to prevent your construction site from damage.
Foundation
There are two ways of basement foundation waterproofing: internally and externally.
It is recommended to apply various external waterproofing methods during the construction period to avoid any damage.
Materials used: Specialised mixtures for external waterproofing, Kota stone and bitumen.
Terraces
One of the concerns related to waterproofing is terraces.
You must have observed rainwater or water leaking from the water tanks spoil the flooring and, water may seep through the roof of the floor underneath.
For terrace waterproofing, ensure the house structure is complete and rainwater pipes and electric conduits are installed.
Kitchen and washroom areas
Washrooms and kitchens have a water pipe area that is below the floor.
Water in these areas can damage the area, and hence waterproofing is a must.
It will help avoid water seeping through the floor or walls and destroying the construction of the house.
Inspection:
The last step in this process is an inspection by the local authorities.
The city inspector does the first Inspection once the curing process is finished. He visits the site to check if foundation components are up to code and installed properly.
The second inspection takes place to check rough framing, plumbing, and electrical and mechanical systems.
In this phase, the inspector checks if building codes are followed and complied with. Usually, at this stage, there are three different inspections. The framing inspection is inspected separately from the electrical and mechanical inspections.
Also, drywall (such as plasterboard, wallboard, or gypsum board) is passed to the building site.
While you finish the plumbing and electric installation successfully, with the help of this guide, let’s move further with another set of guidelines for using appropriate tools and tape for drywall, which is effective and more efficient than any plaster.